A new interior door can update a room, but ordering the right size takes more than measuring the visible door. The trim hides the framing, and the door size listed in a catalog doesn’t necessarily describe the space needed for installation. Careful measurements can help prevent a return or an unexpected fitting problem.
First, decide what you’re replacing. A slab is the door alone, fitted to your existing frame. A prehung unit arrives mounted in its own frame, called a jamb. For a slab replacement, measure the existing door, its thickness, and its hardware locations. For a prehung replacement, the steps below focus on rough-opening width, height, and wall depth.
Key Takeaways
- Measure the framing, not the trim. Rough-opening dimensions run stud to stud and floor to header.
- Measure in several places. Record all readings and highlight the smallest width and height.
- Account for the finished floor. Any change in floor height affects the usable opening.
- Match jamb depth to wall depth. A mismatch can prevent the trim from sitting flat.
- Check the exact product requirements. Installation allowances vary by manufacturer and door type.
What a Rough Opening Really Is
The rough opening is the framed hole behind the door jamb and casing, the decorative trim around the doorway. Studs form its sides, and a header spans the top. A prehung unit must fit inside this space with enough room for shims, the thin wedges used to position the jamb vertically and square its corners.
Measuring resources such as Doors For Pros can help you organize the job. Record the framing dimensions you actually have, then compare them with the rough-opening requirements for the specific door you want. Don’t assume an allowance from an exterior-door guide applies to an interior unit.
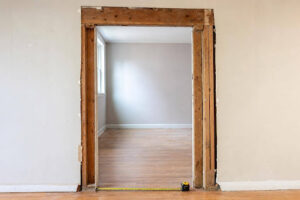
Decide: Slab or Prehung
A slab replacement makes sense when the existing jamb is straight, undamaged, and worth keeping. The new door must fit the frame and match the hinge and latch locations, or be prepared to suit them. Rough-opening dimensions alone won’t tell you which slab to order.
A prehung unit is often a better choice when the existing jamb is damaged or crooked. Its new frame can be adjusted during installation, provided the rough opening has enough space. A prehung unit won’t fix damaged or severely misaligned wall framing.
Prep and Tools
Gather a utility knife, putty knife, pry bar, tape measure, long level, straightedge, and notepad or phone. Wear safety glasses and gloves. Photograph both sides of the doorway before removing anything so you can show the supplier the existing setup.
In an older home, painted trim may contain lead. Check applicable lead-safe guidance and arrange testing when needed before cutting, scraping, or prying painted surfaces.
Expose the Framing
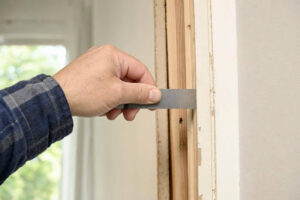
Once it’s safe to disturb the finish, score the paint and caulk lines around the casing. Slide a putty knife behind it to protect the wall, then gently work the pry bar along the trim. Support each section as you loosen it, and set reusable pieces aside.
Removing the casing usually reveals the gap between the old jamb and the framing. If the jamb or drywall prevents a reliable stud-to-stud measurement, have an installer expose and measure the opening. Don’t substitute the clear space inside the existing jamb for the rough-opening width.
Measure Width in Three Places
Measure from the inside face of one framing stud to the inside face of the other near the header, at the middle, and near the floor. Keep the tape level. Write down all three readings and highlight the smallest; the new unit must clear the narrowest part of the opening.
As a cross-check, the door rough opening checklist can help organize width, height, and wall-depth readings. Treat any examples as illustrative, then confirm final allowances with the manufacturer’s requirements for your chosen unit.
Avoid adding a standard allowance to the advertised door width without checking the specifications. That advertised size may describe the slab rather than the complete prehung assembly.
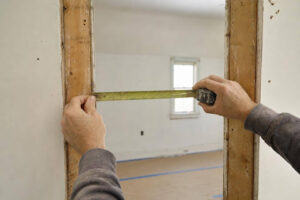
Measure Height the Right Way
Measure from the finished floor to the underside of the header on both sides of the opening, and record the smaller figure. Note your starting surface so the supplier knows whether the reading begins at finished flooring or bare subfloor. Confirm that it matches the reference used in the product’s installation instructions.
If the flooring will change, adjust for the difference between the current and planned finished-floor levels. For example, a floor that will sit 3/8 inch higher reduces the usable opening height by 3/8 inch. If you’re measuring from bare subfloor, account for the full planned flooring buildup.
Also confirm the required clearance below the door and any trimming limits. Don’t assume every interior door allows the same gap or can be shortened by the same amount.
Confirm Wall Depth and Jamb Depth
Measure from the finished wall face on one side to the finished wall face on the other. Include drywall, plaster, tile, or other finishes, and check several spots. This total wall thickness is the measurement to compare with the jamb depth.
A jamb that’s too shallow or too deep can leave the casing uneven against the wall. Ask the supplier which available jamb depth suits your measurements and whether any adjustment or extension is needed.
Flat-jamb units have a set depth. Split-jamb units have two sections that fit together and may offer limited adjustment. Check the adjustment range rather than assuming a split jamb will accommodate any wall thickness.
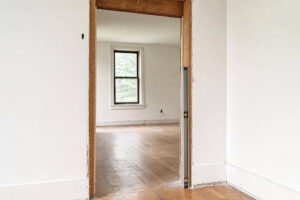
Check Plumb, Level, and Square
Hold a long level against each framing stud to check plumb, meaning vertical, then across the header to check level. Check the floor too, since a slope can affect jamb placement and door clearance.
Next, measure diagonally from corner to corner in both directions. Similar diagonal readings, together with plumb sides and a level header, help confirm that the opening is square. Width and height alone don’t reveal every alignment problem.
Shims can accommodate minor irregularities when there’s enough installation space. Larger differences may require framing repairs. If the framing looks damaged or altered, have a carpenter assess it before you order or modify anything structural.
Handing and Swing
Handing describes the door’s hinge orientation, but suppliers may use different conventions. Record which side the hinges are on from a clearly identified viewpoint, such as the hallway, and whether the door swings toward or away from you. Send a photo or simple sketch and confirm the supplier’s designation before ordering.
Check that the planned swing clears nearby furniture, switches, and other doors. Don’t assume reversing the swing is a simple change to an existing slab or frame.
Turn the Numbers Into an Order
Send the supplier your smallest stud-to-stud width, smallest floor-to-header height, floor reference, wall depth, and planned flooring changes. Include the existing slab dimensions as a reference, along with handing, swing, and photos. Ask for the rough-opening requirements and jamb depth for the exact product line.
The Doors For Pros checklist can help you review those readings before submitting them. The manufacturer’s specifications determine fit, so resolve any discrepancy with the supplier rather than rounding a measurement to the nearest stock size.
Common Pitfalls and Fixes
- Measuring over the casing. Expose the framing or have an installer verify the opening.
- Miscounting flooring thickness. Adjust for the change in finished-floor height, not automatically the full thickness of replacement flooring.
- Borrowing another product’s allowance. Use the specifications for your exact door unit.
- Guessing jamb depth. Measure the full finished wall thickness in several places.
- Ignoring crooked framing. Confirm that the unit can be installed plumb and square within the available space, or arrange repairs first.
Before You Order
- Framing exposed or measurements verified by an installer
- Width measured in three places, with the smallest recorded
- Height measured on both sides, with the floor reference noted
- Planned flooring changes accounted for
- Wall depth measured and matched to a suitable jamb
- Plumb, level, and diagonals checked
- Handing and swing confirmed with the supplier
- Manufacturer requirements checked for the exact product line
Match the Door to the Opening
Accurate measurements give the supplier and installer a reliable starting point. Keep your readings, photos, and product specifications together, and settle any questions about fit before placing the order. That preparation reduces the chance of avoidable adjustments on installation day.
Click here for more details.